 Note: Most of the classes this year are made up of first, second and third-year students. If you are a second or third-year student and you have done this assignment before, I will only expect that you do an even better job this time :-) OK, so before you get into this assignment, let me advise you that at the very bottom of this post is a link to a tutorial I put up on our YouTube channel that will be EXTREMELY HELPFUL to you as you complete this assignment. PLEASE, take the time to watch it. Using your VERY BEST Photo Compositing skills, create an image of an imaginary animal doing something that is a uniquely HUMAN activity (something only people, among all other animals, do) in an unusual place. REQUIREMENTS: 1. Your imaginary animal will be created from images of bits and pieces of four (4) other animals. 2. Your animal will be placed into a background image that is separate from any of the other images you use. 3. Any other objects you put into your own composition (project) must come from images that are separate from any other images you use. 4. DO NOT use .png files or any other type of image that has a transparent or flat, single-colored background. SAVE ALL OF THE IMAGES YOU USE AS FILES THAT ARE SEPARATE FROM YOUR PROJECT. You will have to turn in your project AS WELL AS all of the original images. The image above is my finished project (teacher example). The image below is one in which I combined all of my "source photos'. Other Stuff: - Use images that have a pixel value higher than 1000 for the larger size. For example, let's say you find a photo in Google that you want to use. Underneath the photo will be numbers that represent the the number of pixels that the image is made of. If that photo has a pixel count of 232 x 312 (for instance), then it is a pretty low quality image. Don't use it. Choose another image with it's larger number being over 1000... let's say 800 x 1340. The background image should have a larger number above 1800 pixels. - For helpful hints and tips on photo compositing and digital painting (which you will have to do for this project), go to the YouTube channel. In YouTube, search "JLCP Art". Check the tutorials. They will be very helpful. The tutorial on Digital Painting (which is something you're going to need to do for this project) can be found at: https://www.youtube.com/watch?v=gC9oS_gh0SY If the link doesn't take you directly to the video, copy and paste the address in the address bar of your browser.  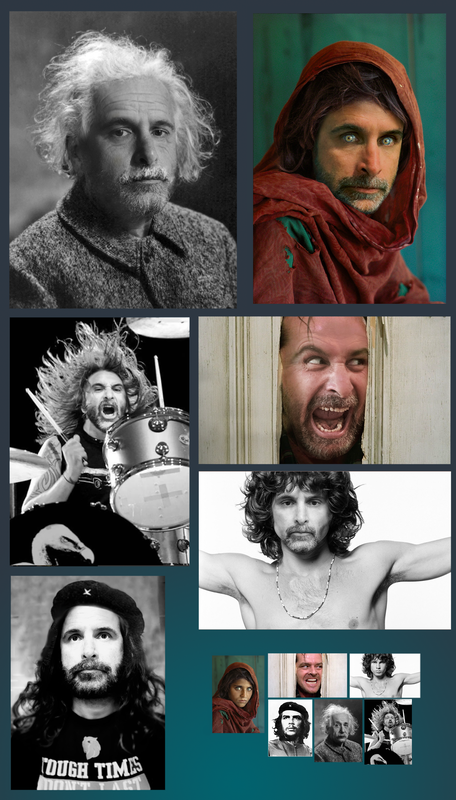 THE REAL TRICK to changing a person's identity in a photograph is to pay attention to what you're getting rid of. If you are putting a new face over an existing face, look for details in the existing face that you want the new face to have. Examples include: 1 Orientation of the original face. Which way is the existing face pointing? Left, right, up, down? 2 Shadows and highlights. Where are the shadows and highlights on the original face? You want the new face to be the same. 3 Type of Image. Seems obvious, but is the original image color or grayscale? blurry or sharply in focus? The new one needs to look like that. This kind of work is a great example of stuff that can be really simple AND hard to do at the same time. Because all you're really doing is cutting a face from one image and pasting it on another image. Easy to do... very challenging to do well. So here's your assignment... Using Pixlr or similar app/program, take photos of six (6) well known people (celebrities, whatever) and replace the faces in those images with your own face. The two simplest ways to take the pictures of yourself (unless you can find good ones online somewhere) is either using your computer's built in camera (type "camera" in your desktop's search bar) OR use your phone to take the pictures and then email them to yourself. And as much as possible, make it look real. First year students, please don't worry. I will grade you guys gently on this one. I just want you to go through the process of doing this. If you end up with images that look real, awesome. But this is hard to do well. And aside from that, have fun with this. It's due this Friday by the end of school. 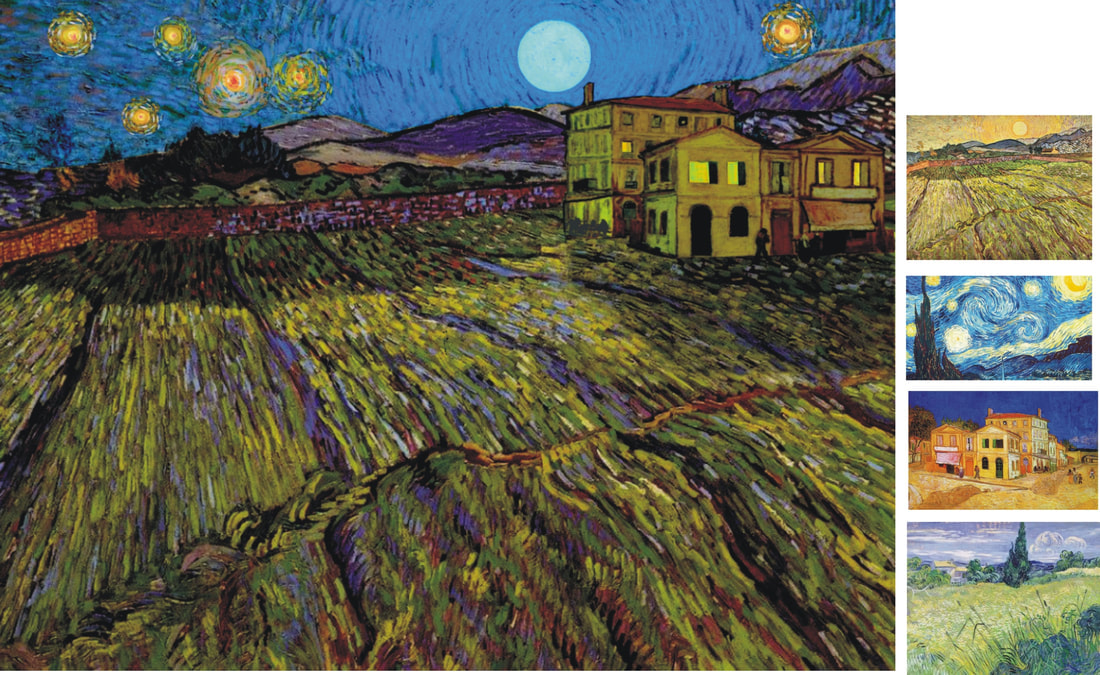 Assignment #5A
Create an art forgery. Select a famous painter (artist), someone whose work sells for millions of dollars. If you're not sure who such a person is, Google it. Then select 4 or 5 of his or her well-known paintings. Working in Pixlr, Sumo, Photoshop, etc., copy/cut and paste objects or parts of each of those well-known paintings to create a new composition (painting). Your "new" painting should not be able to be recognized as any one of the original paintings, but a new work made of the bits and pieces of the artist's known paintings. This is similar in a way to what art forgery artists do. They make paintings that look so much like the paintings of famous artists that they are thought to be "lost works" (paintings the artist made that the world did not know existed and were "discovered"). These artworks are often inspected by experts and usually found to be fakes. But sometimes these fakes are accepted by the world as genuine and sell for millions of dollars. It is estimated that as much as 10% of the art in museums around the world is counterfeit. This project is due by the end of school on Friday, October 23, 2020  Directions:
1 Choose a real-life product. Something you can actually buy. 2 Create an advertisement for that product that is the size of a full page magazine ad. 3 In a real advertisement, you want to make the reader desire your product. To make them feel like their lives will be better if they own it. With this assignment, you are going to completely make fun of the people that you are advertising to as well as the product itself. 4 Your advertisement should tell us what your product is as well as tell us a little about who your target audience is. 5 This project is meant to have fun with. Try to be funny. This is a spoof, it is satire. Let it be silly. 6 Begin with a 2000 px (tall) X 1400 px (wide) work space in Pixlr, Gimp or Photoshop. You may also do all of your text in any of those programs. 7 Save your work as a .png file. 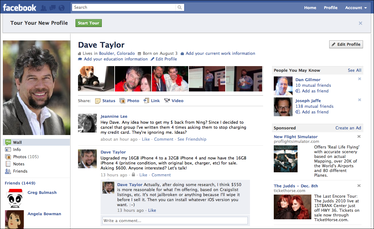 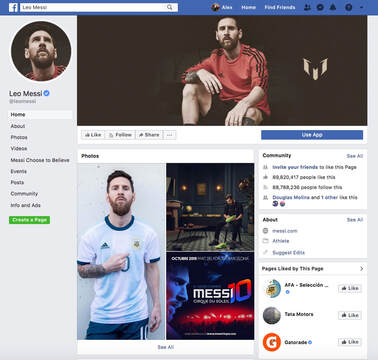 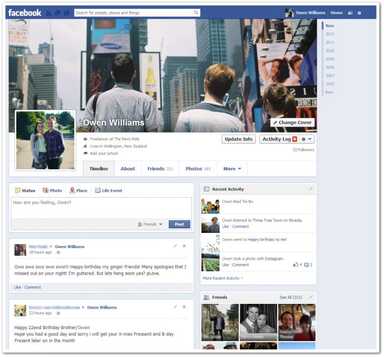 ASSIGNMENT 1 Create a fictional character. Let your character be EXTREME... hilarious, ridiculous, scary, weird or overly-serious (it could be one of these things or make up your own). But the more extreme your character is, the better. 2 Using the template below, make a fictional Facebook page for your fictional character. Right-click (using a mouse) or two-finger click (on a laptop track pad) on the template below, click SAVE AS and save the template on your computer. 3 Open the template in Pixlr or Gimp (or whatever "Raster Editor" program you can get to work) and fill it in with appropriate images and text to complete your character's profile page. Tip: you will have to add images and text, but with the text you will have to erase the text that's already there. Grading: Your project will be graded based on the originality of your idea and the quality of your editing. Trim your images to fit neatly and write your text in a font that is similar to what is already in the different places on the template. In short, the more EXTREME your character is and the more believable your FB page is, the higher your grade will be. This assignment is due FRIDAY, OCTOBER 9th by 3;00pm. Here is the template: 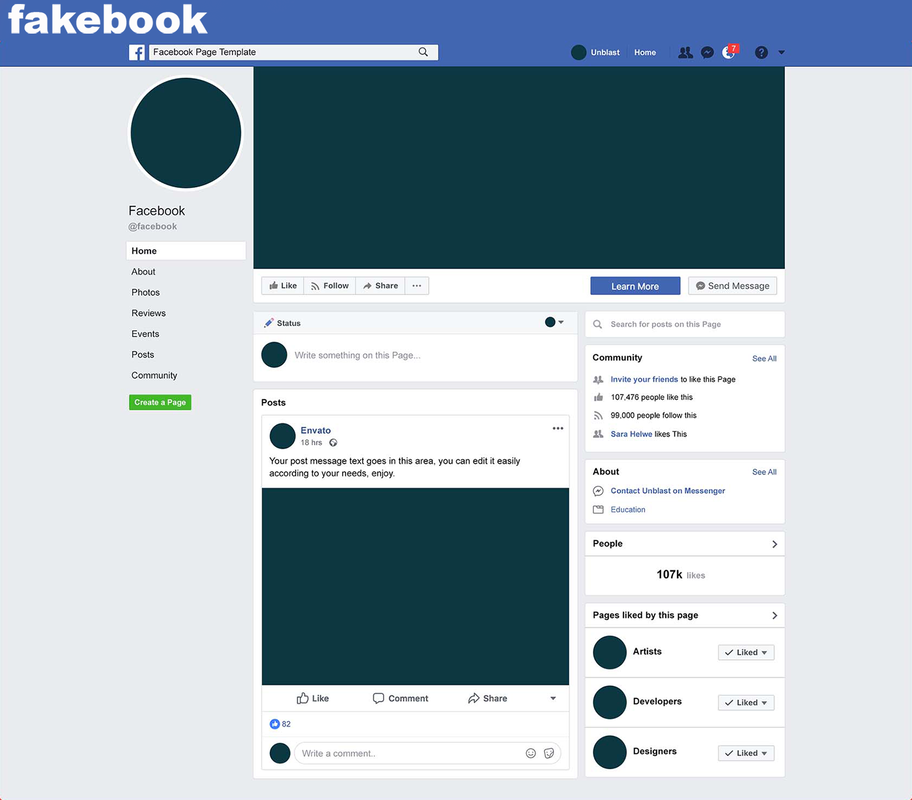 Today's assignment is really simple. Second and third year students should have no problem at all with it. But EVERYONE, first, second and third year alike, needs to be able to do this... So do the following things: 1 Watch the video from the DPL Visual Arts YouTube channel titled "FINDING, DOWNLOADING and OPENING INKSCAPE". 2 Find and SAVE an image online that you would like to work with. 3 Find, download and open INKSCAPE PORTABLE 4 Once INKSCAPE PORTABLE is open, go to FILE and then IMPORT. At the bottom of the IMPORT box click FILES OF TYPE and then select ALL IMAGES. Find your image on your computer, select it and then go to OPEN. 5 Once your file opens in INKSCAPE, I want you to look at the tools in the TOOL BAR on the left side of the screen. It looks like this:  NOW, I don't care WHAT you do to your image, as long as you REALLY mess it up (that is to say alter or change it) using the different tools in the TOOL BAR. Just experiment with them, see what you can get them to do... PLAY. Your Assignment #3A will be considered highly successful as long as you've drawn, scribbled, typed or otherwise changed the appearance of your image A LOT. Just make sure I can still see part of the original image so I can recognize it.
Using the skills that we practiced while completing ASSIGNMENT #1A, follow the directions below to complete ASSIGNMENT #2A.
DIRECTIONS: 1 Go to our YouTube channel by opening YouTube and searching DPL Visual Arts 2 Watch the video tutorials named WORKING with 2IMAGES in PIXLR and CLONESTAMP and SAVE 3 Using the techniques from the video tutorials, create an image in PIXLR that combines pieces of two different images. Use the CLONE STAMP tool to join the two different images together in a way that looks natural... make the two images look like they belong together. 4 Using the technique from the video tutorials, save your new image as a .png file either on a flash drive, the hard drive of the computer you are using or in any other way you want. Just make sure it is saved so that you can turn it in. I will post directions for turning the work in sometime in the next few days. Until then, just don't lose it. This assignment will be the first in a new series of graded assignments for ALL JLCP Digital Art Students. Like this assignment, future assignments will all also have an "A" in the assignment name.
Don't worry, these assignments will be graded just like all the others and your grades for them will factor into your class quarter grades just like they always have. But for the next month or so, while I am not at school, all of our assignments will be like this one. Really, the work is the same. I'm just giving these different titles to be able to organize them while I am on leave. Just think of them as new assignments... everything else is the same as it's always been. DIRECTIONS: 1. Go to YouTube and search for "DPL Visual Arts" 2. There are 4 video tutorials. Watch them in this order: 1st "Saving Images" 2nd "Finding and Opening Pixlr Editor" 3rd "Opening Pixlr and Using Layers" 4th "Pixlr Select and Effects" 3. Find and save an online image 4. Open the image in Pixlr 5. Select an area using any of the Select Tools and DRAMATICALLY ALTER the appearance of that area by changing the Color or Brightness or Contrast AND by using a filter. Do this for ten (10) different areas. So the BASIC IDEA is that I will be able to look at your assignment and know that you were able to select and alter (change the appearance of) 10 different areas. The more obvious your changes are, the better. WHEN YOU ARE DONE, SAVE YOUR WORK as a .png file by doing the following: 1. Go to FILE 2. Select SAVE IMAGE 3. Give your work a name 4. Click the box that says .JPG for the file type. Select .PNG instead. 5. Save your work on a flash drive, on that computer's hard drive or any other way you can think of. Just make sure you can find it later. For today, please work on your sketches. Do the digital ones if you can, but feel free to work on the hand drawn ones too. Ask for paper if you need it.
|
AuthorDaniel P. Loughran is an artist and art educator who lives in Jacksonville Beach, Florida. Archives
September 2020
Categories |
 RSS Feed
