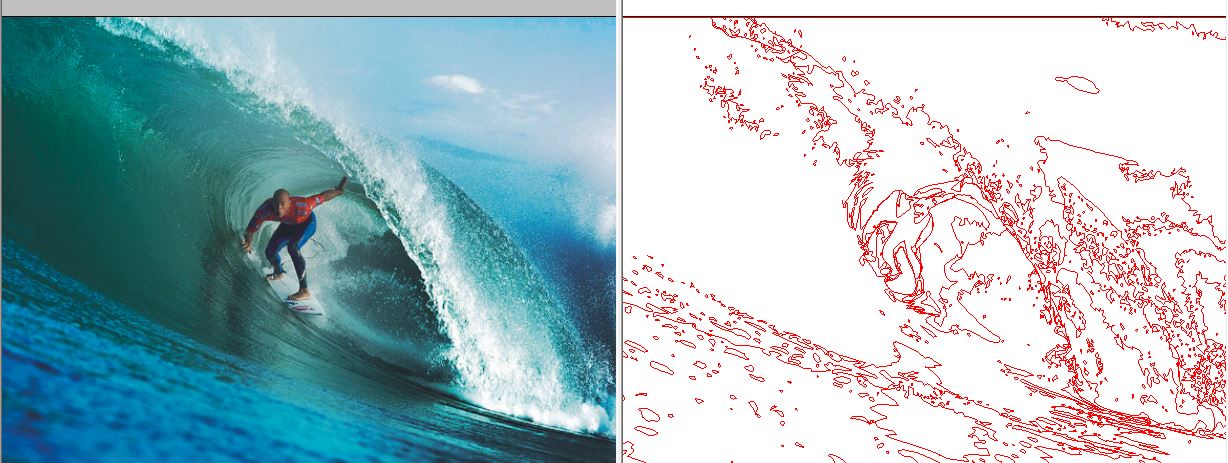
 Select a full color photo (not cartoon, but a photo of something from real-life) from the internet. IMPORT that photo into Inkscape. Using the pencil tool, create a line drawing by tracing the majority of the shapes in the photo, meaning the shapes you can clearly see. The photograph you use to trace must be at least 1000 px on the long side of the photo (ex. 898 px x 1200 px.) Using a higher resolution photograph will make your job much easier. Make your line 1 pixel (px) wide. Use a bold, bright line color. It makes keeping track of what shapes you have already traced a lot easier. You can set up your line width and color before you start so that you don't have to change it at all as you're drawing (known as "Default Setting"). Instructions for setting the line default color and width are below. Save the traced drawing AND the original image and be prepared to turn in both. Oh, and do good work! :) Also... Very Important! AS you're working on this, make sure to save your work in INKSCAPE as an .svg file. You will need to come back to it each day to work on it. You will need all of your objects to remain editable. When you are done, you will delete the photo from the drawing so that only the lines you've drawn remain. When you are finished, that final drawing must be saved as a .png file. YOUR WORK WILL BE GRADED BASED UPON: 1 THE COMPLEXITY OF YOUR TRACING. FOR YOUR WORK TO BE CONSIDERED OF "A" QUALITY, THERE SHOULD BE A MINIMUM OF 200 INDIVIDUAL SHAPES DRAWN. 2 THE QUALITY OF YOUR TRACING. WHEN EXAMINED CLOSELY, THE TRACED SHAPES IN YOUR DRAWING SHOULD BE DRAWN WITH CARE. AND WHILE NOT PERFECT, THOSE TRACED SHAPES SHOULD BE PRETTY CLOSE TO THE ORIGINAL SHAPES IN THE PHOTO. PLEASE HAVE A LOOK AT MY EXAMPLE BELOW. I WOULD CONSIDER THOSE SHAPES TO HAVE BEEN DRAWN WITH GREAT CARE.  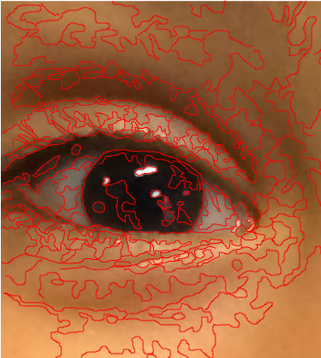 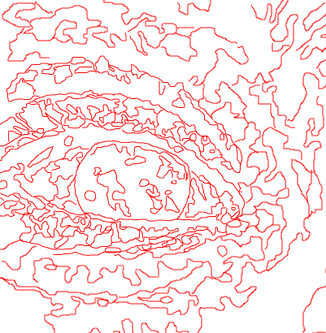
ADJUSTING DEFAULT SETTINGS FOR THE PENCIL TOOL: 1 CLICK THE PENCIL TOOL 2 DRAW A LINE BY PRESSING AND HOLDING THE MOUSE BUTTON WHILE MOVING THE MOUSE. IF YOU NEED TO DRAW A PERFECTLY STRAIGHT LINE, CLICK ONCE WITH THE MOUSE, MOVE THE MOUSE WITHOUT HOLDING DOWN THE BUTTON TO THE END OF THE LINE YOU'RE DRAWING AND THEN CLICK AGAIN 3 IN THE TOP MENU BAR, CLICK OBJECT. THEN CLICK FILL AND STROKE IN THE DROPDOWN MENU BELOW IT 4 IN THE FLYOUT MENU THAT APPEARS ON THE RIGHT SIDE OF THE SCREEN, THERE ARE THREE TABS: FILL, STROKE COLOR AND STROKE STYLE 5 FOR FILL, CLICK THE "X" FOR STROKE COLOR, SELECT A COLOR THAT WILL REALLY STAND OUT FROM THE COLORS IN YOUR PHOTO FOR STROKE STYLE, SET THE WIDTH TO 1 MM (THE LINE YOU'VE ALREADY DRAWN IN YOUR ONSCREEN WORKSPACE SHOULD NOW APPEAR AS A THIN LINE WITH THE COLOR YOU CHOSE) 6 CLICK EDIT IN THE TOP TOOLBAR 7 CLICK PREFERENCES 8 CLICK PENCIL UNDER THE LIST OF TOOLS 9 UNDER STYLE OF NEW OBJECTS CLICK LAST USED STYLE NOTE: FOR SOME REASON, FOLLOWING THE STEPS ABOVE SOMETIMES DOESN'T WORK. IF THIS HAPPENS, FOLLOW THE STEPS AGAIN... IT SHOULD WORK THE SECOND TIME
Surfer
1/29/2019 06:58:47 am
I surf the net
hi
1/29/2019 11:14:15 am
hi
BIG PAPA JOE
1/30/2019 06:47:44 am
Do I have to do this?
random kid
1/30/2019 06:52:25 am
L L
Hi, im,
1/30/2019 04:49:56 pm
well, ya know, a random person, but, im doing a tiller fire engine
tracer
2/1/2019 08:55:40 am
im already tracing tracer Comments are closed.
|
AuthorDaniel P. Loughran is an artist and art educator who lives in Jacksonville Beach, Florida. Archives
September 2020
Categories |
 RSS Feed
